
As I was testing different distributions I was really blown away at the variety and quality of the different desktop environments. I was incredibly impressed by how robust and powerful some were, such as KDE, and how functional and sleek others were, like Cinnamon. While I did eventually decide to settle on Ubuntu because of their massive user base and application support (Steam, Lightworks, etc.), it was not an easy decision to make, mostly because of how much I had enjoyed many of these desktop experiences. I could really see how certain desktops would be perfect for certain tasks, and finding one that was good for all tasks was almost impossible, at least for my multifaceted workflow that is. Wouldn’t it be great if you could use Ubuntu as a base and choose which desktop environment happens to suit your current needs. Well, as it turns out, you can and it’s actually incredibly simple to do. I want to give a quick run through of how I setup my Ubuntu 12.10 system to allow me to choose between my favorite desktop environments at login.
Unity
This one comes standard with a new install of Ubuntu 12.10 and while it gets a lot of mixed reviews, I actually really like it. It’s a great interface for when I’m working with web applications. With web app support for google docs, reddit, google+ and many more, I find myself using Unity when I’m in a browsing mood. No special steps required to get this one rolling.
LXDE
This is a super lightweight, low profile desktop environment. It loads up insanely fast and takes very little system resources to run. Although I wouldn’t say it’s exactly beautiful to look at, when I need to get some real computing done, thats the last thing I care about. I have been playing with Blender over the past couple of weeks and I could definitely see the benefit of this option when building and rendering complex scenes. To get this desktop simply open the terminal and enter the following:
- sudo apt-get install lxde
KDE

I’m still discovering all the awesomeness that is kde. I love the idea of activities and could see this being incredibly helpful. I also found it really useful for setting up application menu entries, which I discovered totally by accident. I had downloaded the latest blender release from blender.org (not from the ubuntu software centre) and extracted the files to a folder in my home directory called “Blender”. Although I could start the application by double clicking the blender executable file, I wasn’t able to see it in my application lens. Not the end of the world, but something I wanted to eventually rectify. After installing kde and booting it up, I dragged that same blender executable file to the main panel, right clicked it and chose "icon settings". After clicking on the icon within the next window I was able to browse to the svg file that blender provides in the package and the icon was applied to the file. Interestingly, when I had switched back to unity, blender now shows up with it’s beautiful vector icon in my application lens. I would encourage everyone to at least try kde, it’s a bit of a bigger download (around 300MB) so if you are really low on storage keep that in mind. To install it just open the terminal and enter:
- sudo apt-get install kde-plasma-desktop
Cinnamon
I was really impressed by this desktop. I was immediately comfortable moving around its workspace, and everything just felt good. I think this desktop is a great option for those switching from windows as its layout will feel pleasantly familiar. It’s simple yet elegant and puts the focus on the applications you are running. To get this desktop up and running, just open the terminal and enter the following:
- sudo add-apt-repository ppa:gwendal-lebihan-dev/cinnamon-stable
- sudo apt-get update
- sudo apt-get install cinnamon
Chrome OS
I had been curios about google’s chrome operating system for a while, so when I saw that it was possible to install it on Ubuntu I just had to give it a shot. I think it only works on a 64 bit system, so make sure that’s what you’re running. Open the terminal and enter the following:
- wget https://github.com/downloads/dz0ny/lightdm-login-chromeos/lightdm-login-chromiumos_1.0_amd64.deb
- sudo dpkg -i lightdm-login-chromiumos_1.0_amd64.deb
Cleaning Up the Login Screen
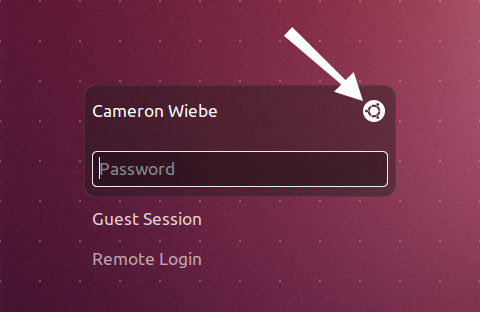
So now that we have a variety of desktops installed, it’s time to try them out. Just log out of your session to get back to the login screen. From here click on the little Ubuntu logo to see all your options. You will probably notice that there is a bunch of desktops that got added that you may not need or want as it can start to get a little cluttered, not to mention unusable if you are on a low resolution monitor. For example, after installing cinnamon, I noticed there were two versions available in the list; Cinnamon and Cinnamon 2D. After using Cinnamon, and seeing that it loaded and worked great, I wanted to remove Cinnamon 2D from the list (along with a few others) and to do this is fairly easy. Just log back into any of your desktop environments and open the terminal. The different options are stored in *.desktop files within the folder /usr/share/xsessions. To remove desktop entries from the login menu, you simply need to rename the ones you don’t want. In the terminal navigate to the folder and rename the appropriate files:
- cd /usr/share/xsessions
- sudo mv cinnamon2d.desktop cinnamon2d.desktop.bac
Continue this method for all the options you wish to remove and the next time you log out, you will see the change. To get an option back just rename it back to the original:
- cd /usr/share/xsessions
- sudo mv cinnamon2d.desktop.bac cinnamon2d.desktop


